
Before setting up the integration, make sure you have the following:
Before connecting Phone Validator to Zoho Flow, you will need your API key.
- Log in to your account at phonevalidator.com.
- Click your name in the top right corner and select My Account.
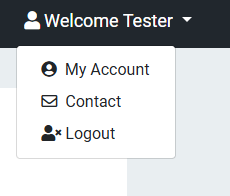
Click your name in the top right corner and select My Account.
- On the My Account page, locate the API Keys row and click Manage API Keys.
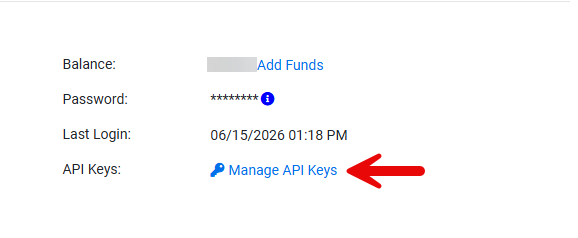
Click Manage API Keys on the My Account page.
- In the Manage API Keys window, copy the key next to your Primary entry. Keep this key safe — you will need it in the next step.
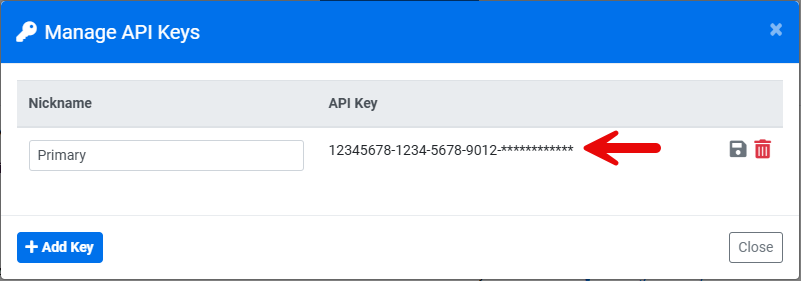
Copy the API key next to your Primary entry.
The integration is built using Zoho Flow's Auth Profile and Connection system, which lets any external API — including Phone Validator — be called securely from your flows.
- In Zoho Flow, go to Settings (left sidebar, gear icon) → Auth Profiles (under “Flow Setup”) → Create Auth Profile.
- Select API Key as the Authentication Method.
-
Fill in the fields:
- Auth Profile Name:
Phone Validator API - Field Label:
API Key - Field Type:
Password - Parameter Name:
apikey - API Key Placement:
Token in Query String
- Auth Profile Name:
- Click Save.
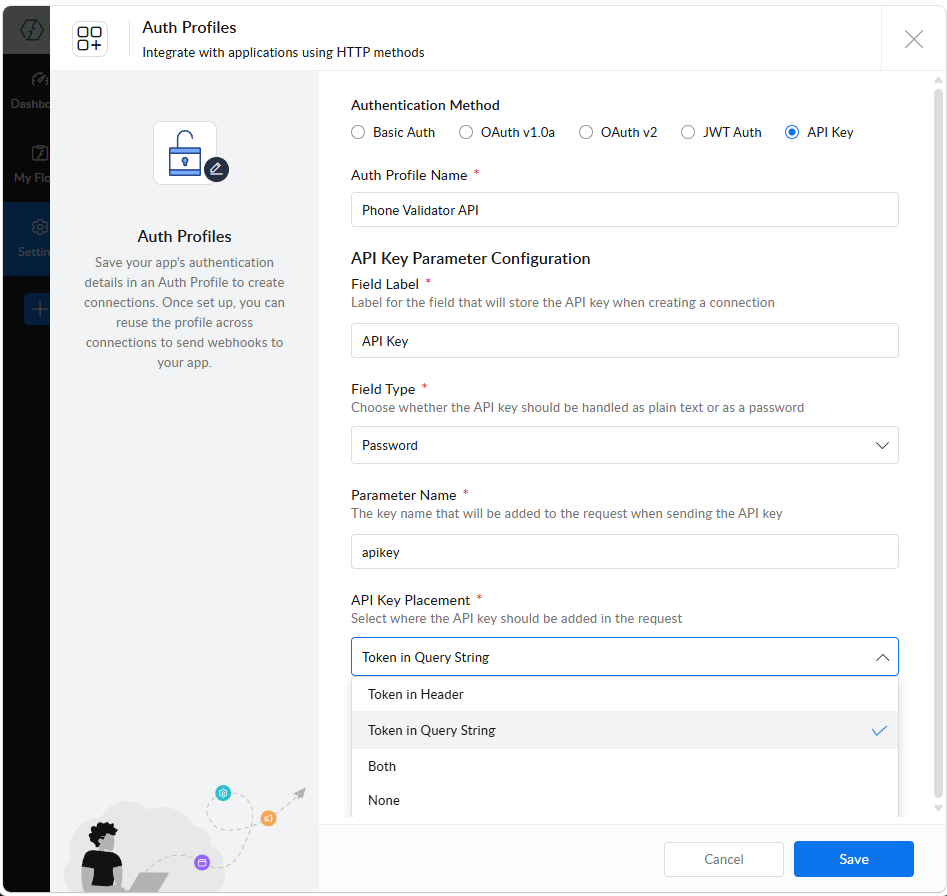
Configure the Auth Profile with API Key authentication and the correct parameter name.
- Go to Settings → Connections → Create Connection.
- Select the Phone Validator API Auth Profile you just created, then click Next.
- Enter a Connection Name (e.g.
Phone Validator Connection) and paste your Phone Validator API key into the API Key field. - Click Authorize.
- Your connection now appears in the Connections list with an Auth Profile tag. Click Test to confirm it says “Connection is working.”
Your connection is now saved and ready to use across all your Zoho Flow flows.
Once your connection is set up, add a Send Webhook action to any flow to validate a phone number.
- In your flow's Builder, go to Built-ins → Outbound Utility → Webhooks → Send Webhook and drag it onto the canvas.
- Under Authorization, select Use a connection, then choose your Phone Validator Connection.
-
Configure the request:
- Method:
GET - URL:
https://api.phonevalidator.com/api/zoho/v1/phonesearch
- Method:
-
Under the Params tab, add:
- Phone Number — map this from a previous step in your flow (e.g. a form submission, CRM record, or spreadsheet row). Phone numbers can be entered with or without punctuation.
- Region — there are three region options:
1,2, or3. Region 1 searches both the U.S. and outside the U.S. Region 2 searches U.S. and Canada only, and will mark any numbers outside as fake. Region 3 searches outside the U.S. and Canada only, and any U.S./Canada numbers will be automatically marked as fake. If you don't know where your numbers are located, or they could be anywhere in the world including the U.S., use Region 1.
- Set Response Type to
JSON. - Click Save.
Because Zoho Flow returns the raw JSON response as a single string rather than individual mapped fields, a small Custom Function is used to parse it into usable, individually mappable values. (Full setup instructions are in the Custom Function section below.) Once parsed, the following data is available to map into subsequent actions in your flow:
| Field | Description |
|---|---|
| Phone Number | The phone number that was validated |
| Line Type | CELL PHONE, LANDLINE, VOIP, TOLL-FREE, UNKNOWN, or FAKE |
| Company | The carrier (e.g. T-Mobile, Verizon, AT&T) |
| Location | City and state/region of the number |
| Country | Full country name |
| Country Code | Two-letter country code (e.g. US, GB, CA) |
| Outside US | YES or NO |
| Fake | YES or NO |
| Fake Reason | Reason if the number is flagged as fake |
| Cost | Cost of the search in dollars |
| Search Date | Date and time the search was performed |
| Status Code | 200 = success, all other codes indicate an error |
| Status Message | OK or error description |
Zoho Flow's Send Webhook action only exposes the response as a flat string — not as individually clickable fields. This Custom Function parses that response so its fields can be mapped normally in subsequent steps of your flow.
- Go to Built-ins → Developer Tools → Custom Functions → +Custom Function.
- Function Name:
parse_pv_response - Return Type:
map - Input Parameters:
response_text, typestring - Click Create. Zoho auto-generates a function signature with opening and closing braces — write your code inside these braces, don't replace them.
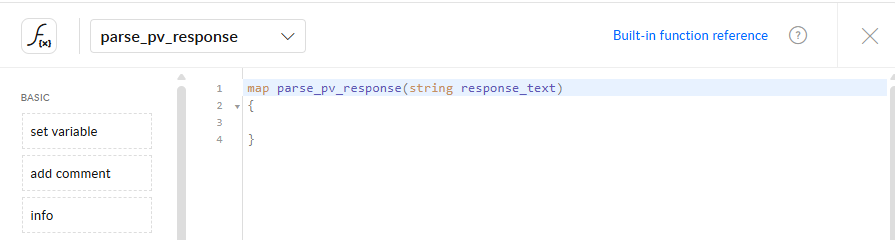
Zoho auto-generates the function signature and braces — your code goes inside them.
Enter the following code inside the braces:
{
resp = response_text.toMap();
basic = resp.get("PhoneBasic");
result = Map();
result.put("line_type", basic.get("LineType"));
result.put("company", basic.get("PhoneCompany"));
result.put("location", basic.get("PhoneLocation"));
result.put("outside_us", basic.get("OutsideUS"));
result.put("country", basic.get("Country"));
result.put("country_code", basic.get("CountryCode"));
result.put("fake", basic.get("FakeNumber"));
result.put("fake_reason", basic.get("FakeNumberReason"));
return result;
}
- Click Save.
- In your flow, drag this function onto the canvas after Send Webhook, and map its
response_textinput to Send Webhook's Response output.
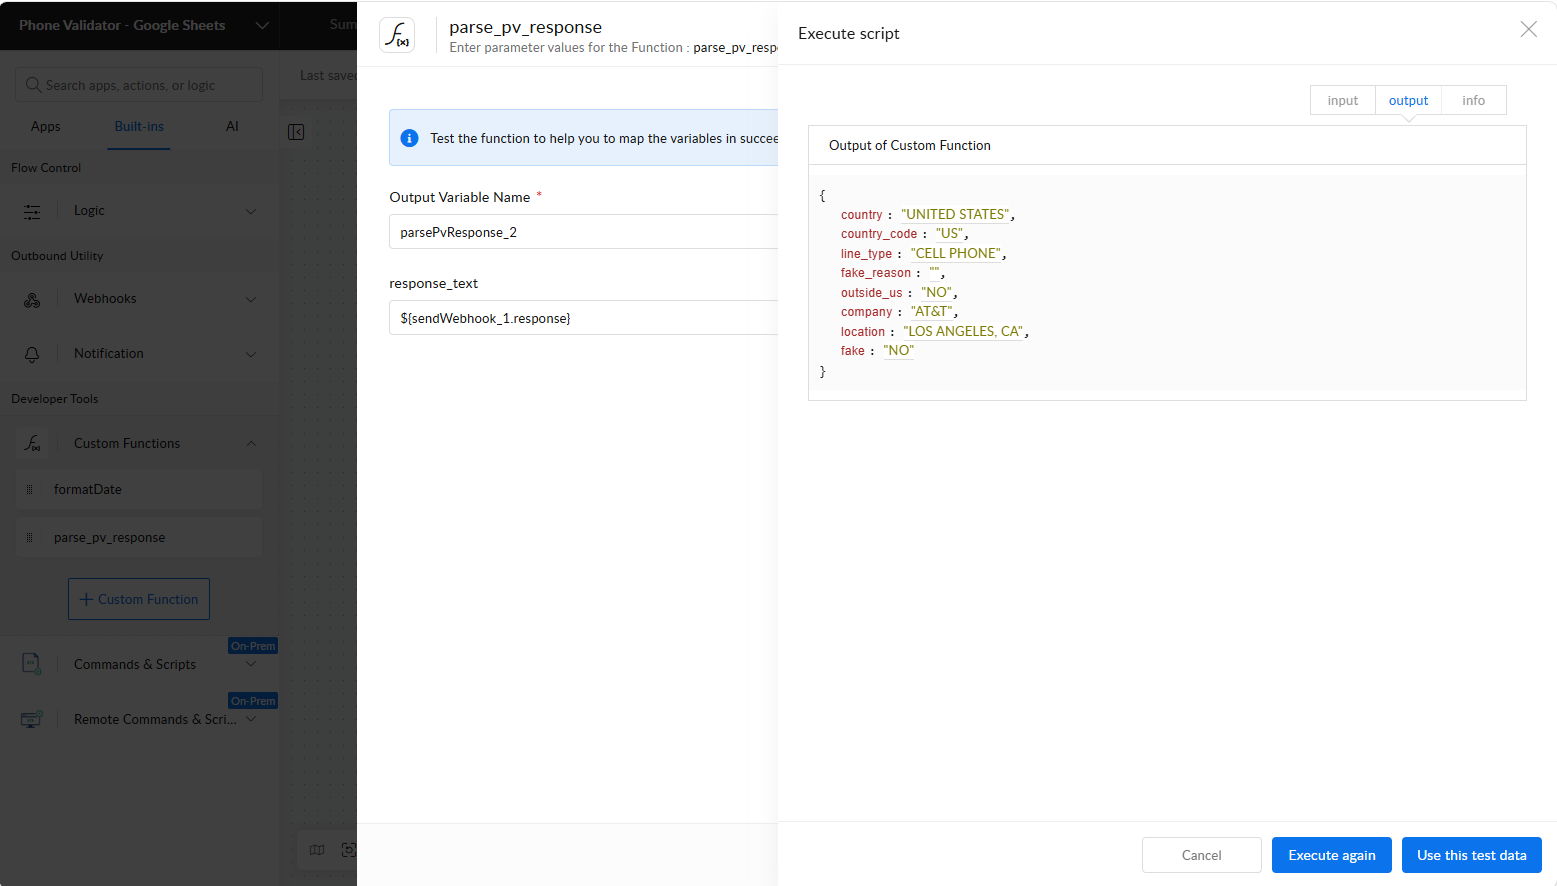
Execute the function with sample data to confirm the parsed output fields.
response_text, and run it once — then Use this test data. Here is a sample response you can use for testing:
Once wired in, the parsed fields (Line Type, Company, Location, Outside US, Country, Country Code, Fake, Fake Reason) become individually mappable in any action that follows, such as updating a Google Sheet or a CRM record.
This example shows how to automatically validate phone numbers entered into a Google Sheet and record the results in the same row — a common lead-validation workflow.
- Google Sheets — Row added (trigger)
- Send Webhook — Phone Validator lookup
- Custom Function — parse_pv_response
- Google Sheets — Update row
- A phone number is entered into a new row in your Google Sheet.
- Zoho Flow's polling trigger picks up the new row (checks every 15 minutes).
- Phone Validator validates the number and returns line type, carrier, location, and fake number status.
- The parsed results are written back into that same row.
Create a new Google Sheet with just the column headers: Phone Number, Line Type, Company, Location, Outside US, Country, Country Code, Fake, Fake Reason. Do not enter any phone numbers yet — leave the sheet with just the header row for now.
- Create the trigger: create a new flow, choose App trigger → Google Sheets → Row added, and connect your Google account.
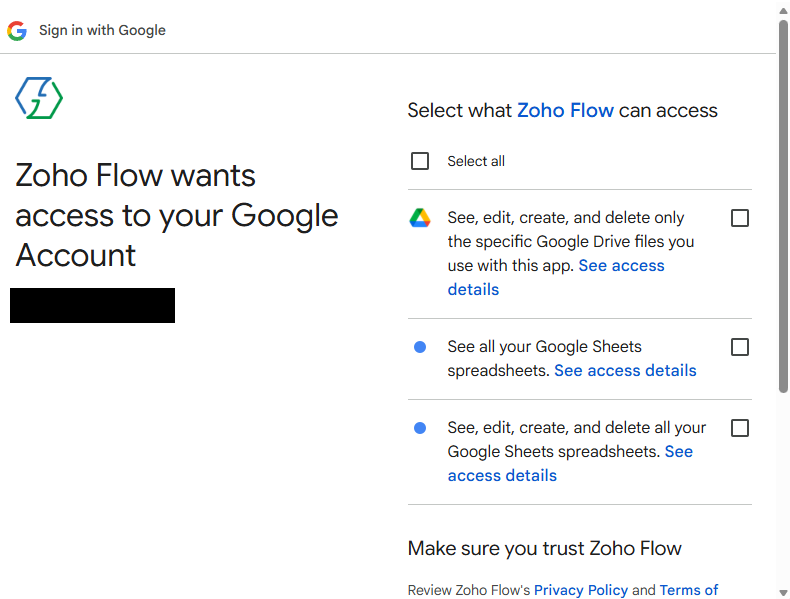
Select the broadest Sheets permission option — the file-scoped option will not work.
- Point the trigger at the spreadsheet you just created in Step 1, and select the correct worksheet.
- Add the Send Webhook action (as configured above), mapping the Phone Number param to the row's Phone Number column.
- Add the parse_pv_response Custom Function, mapping its input to the Send Webhook response.
- Add a Google Sheets — Update row action, mapping each result field to the parsed output:
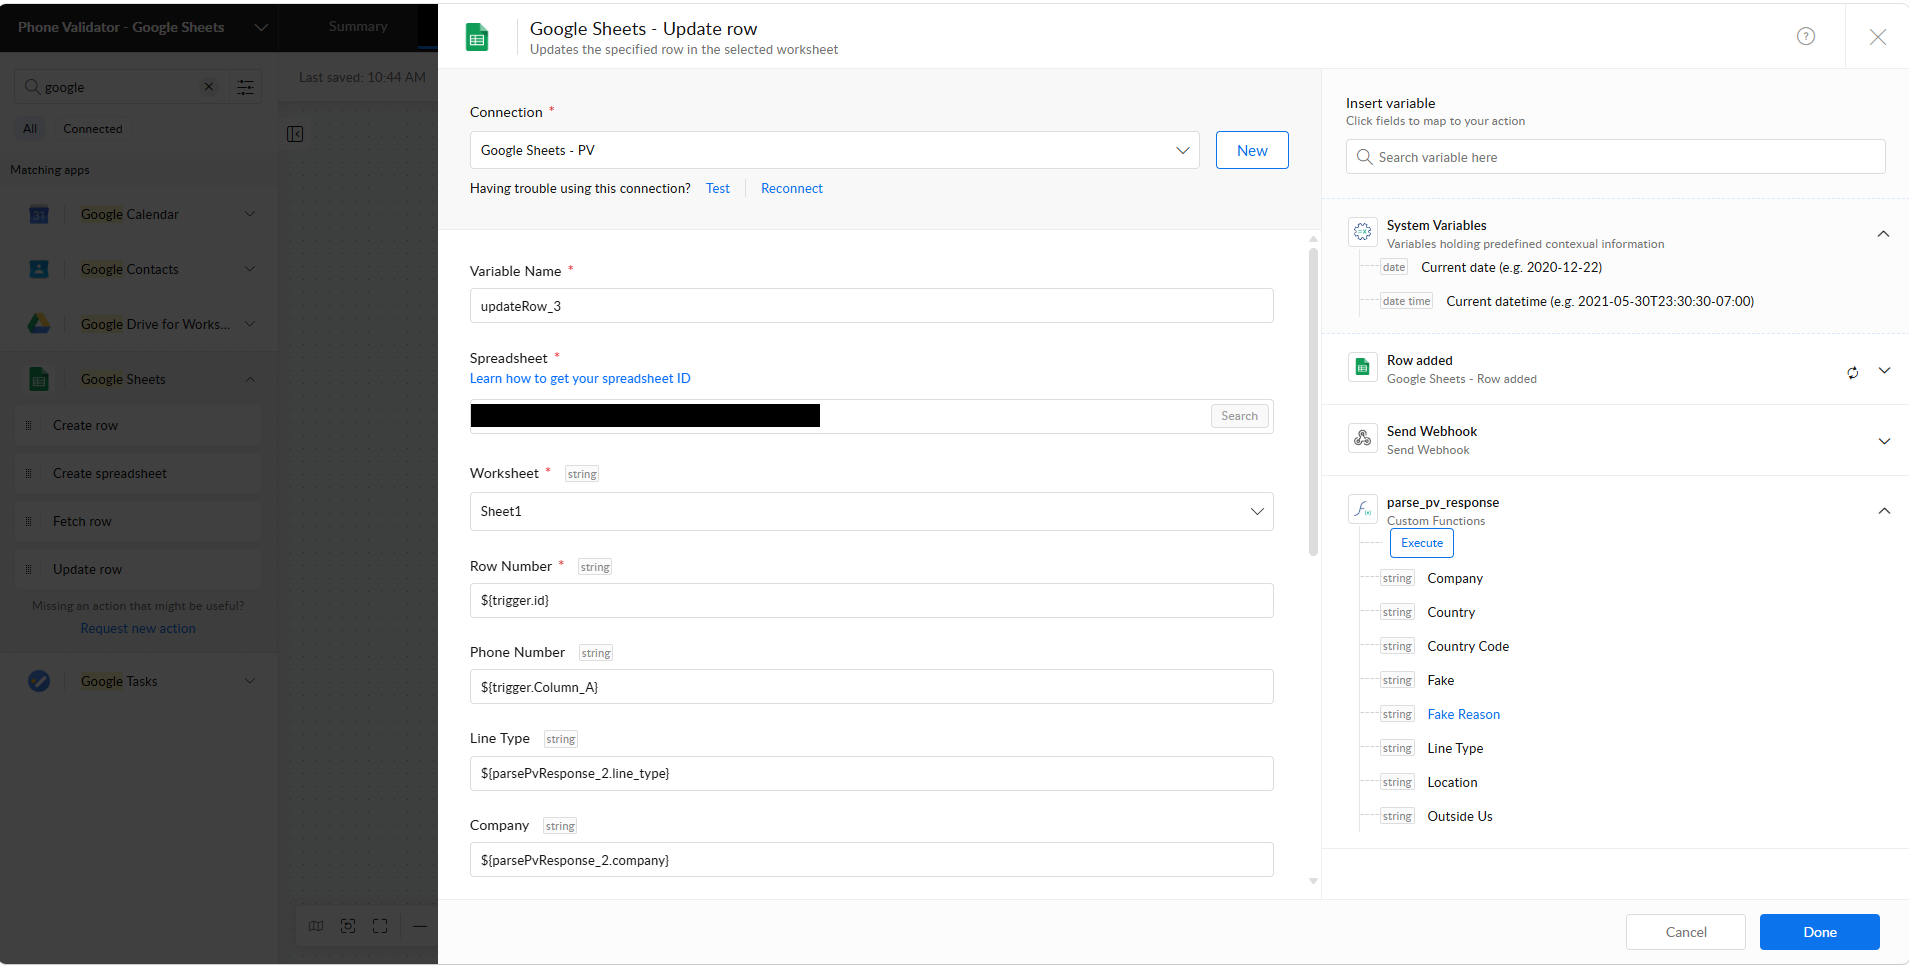
Map each result field to the parsed custom function output — not the original trigger row.
- Turn the flow ON.
With the flow live, you can now enter or paste phone numbers into the sheet. Each new row — whether added one at a time or pasted in as a large batch — triggers its own separate, independent validation run. There's no limit on how many rows you can paste in at once; Zoho Flow queues each one and processes them individually, spread across one or more 15-minute poll cycles depending on volume.
Phone Validator uses a pay-per-search credit system. Each phone number lookup consumes one credit from your phonevalidator.com account.
To manage your credit balance, log in to phonevalidator.com, click your name in the top navigation bar, and select My Account.
Click your name in the top navigation bar and select My Account.
On the My Account page you can view your current balance and click Add Funds to purchase additional credits.
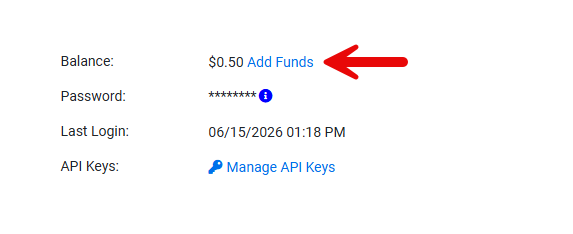
Click Add Funds to purchase additional credits.
To ensure your Zoho flows never stop running due to insufficient credits, set up Auto Refill. This automatically adds credits to your account when your balance falls below a set threshold. Note: Auto Refill requires a credit card on file. Add your card under Credit Cards on File before enabling Auto Refill.
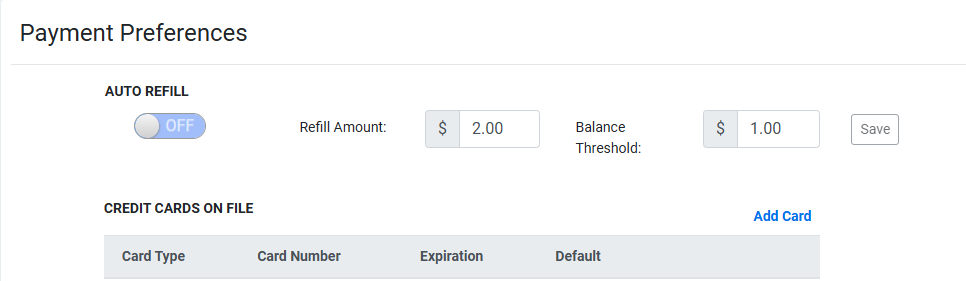
Enable Auto Refill and set your Refill Amount and Balance Threshold. A credit card on file is required.
Ready to get started? Create a free account today.
GET STARTED!